
Hot Chocolate & Almond Croissant
It’s what’s for breakfast!
Rich, delicious, and crazily decadent. And, even better, it’s quick and easy. This intensely chocolate rich drink should be reserved for special occasions and busy weekend days. You made it through a hard week? Treat yourself. This combination will power you through a long, active day. Everything in moderation, know your limits. When you reserve decadent food treats for a special occasion splurge, you’ll enjoy it more on those special days.
Or, better yet, that big mug of deliciousness is simply begging to be shared. Cut that guilt in half by sharing this chocolate-y rich breakfast with someone you love. The satisfaction of sharing turns a half of a portion equally (or, in my eyes even more) satisfying. Food shared with those you love always taste better.
Old World Hot Chocolate
Makes 1 mug
1 big mug of whole milk
1 – 2 Tablespoon cocoa powder (to your taste)
3 ounces dark chocolate
1 Tablespoon brown sugar, or to taste
1/8 teaspoon paprika
1/8 teaspoon ground cloves
pinch white pepper, finely ground
pinch black pepper, finely ground
Heat milk in a small sauce pan. Add cocoa, chocolate, and spices. Stir to until smooth and creamy. Taste. Add additional sugar, if needed. Pour into mug and top with a small spoonful of lightly whipped cream. Garnish with a pinch of dark cocoa, if desired.
Beautiful ingredients morph into magic when they come together.
If I were in the mood to be decadent, I might’ve buttered my toast. Maybe I will next time. That sounds like something I’d like to do when the weather cools off a bit in a few months. But, for now, this crispy, delicious combination doesn’t need any embellishing. It’s perfect just the way it is. And, it can’t get any easier.
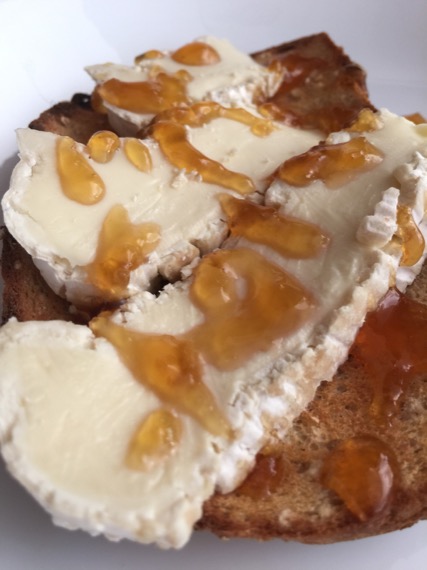
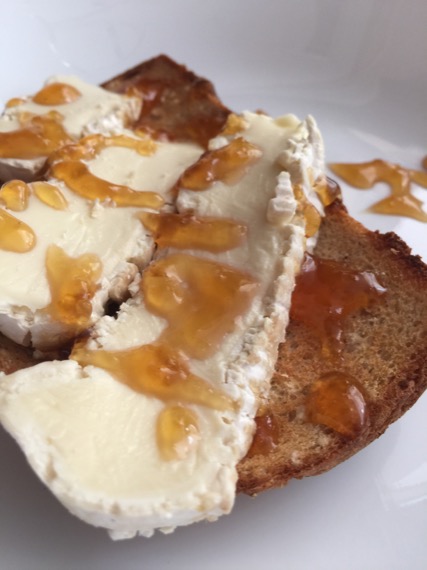
This brie had aged to perfection. The complex sweetness of the honey brought out the funky depth of the brie into the bright light of day in the best possible way. And, little bits of honey comb added a sweet crystalline texture that melts on your tongue. Silky smooth brie keeps the flavor lingering on your taste buds. Without a doubt, this will be my quick and easy breakfast of choice for quite a long while.
It’s a great way to start the day.
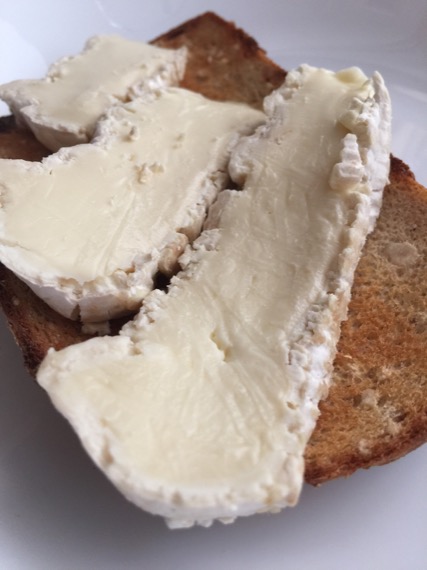
Brie & Honey Toast
makes 1
whole grain bread, toasted dark golden brown
high quality French brie
local honey with little flecks of honey comb
Toast the whole grain bread to a deep, dark golden brown. Then, top with slices of brie (or, if it’s too hard to slice, give a good schemer). Drizzle with honey flecked with honey comb.
Serve with hot tea and fresh fruit. Earl Grey makes a perfect companion to this toast.
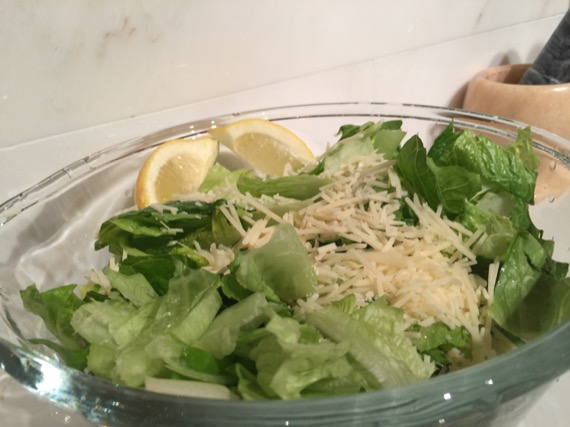
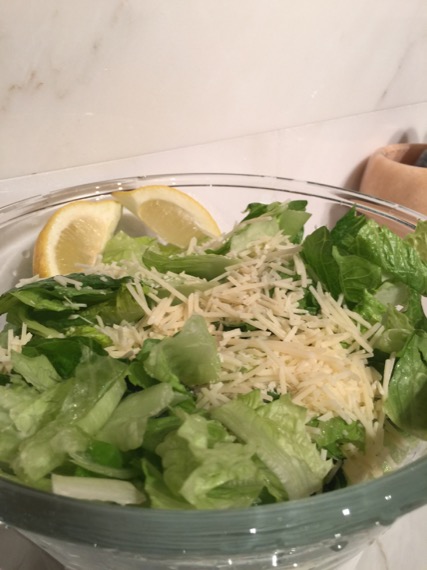
Lemon Tarragon Vinaigrette
makes 1 small bottle
juice of two lemons
1/4 cup olive oil
1 tablespoon fresh tarragon, minced
1 clove garlic, crushed
1 Tablespoon honey
scant 1/2 teaspoon black pepper, freshly ground
1/4 teaspoon fine sea salt, or to taste
In a small measuring cup, combine all. Taste. Let sit for 5-10 minutes. Stir and taste again. Add additional salt and pepper, if needed.
—
Sprinkle salad greens with parmesan. Serve dressing on the side or dress salad greens with vinaigrette. Then, garnish with lemon wedges. Serve at least one lemon wedge per person.
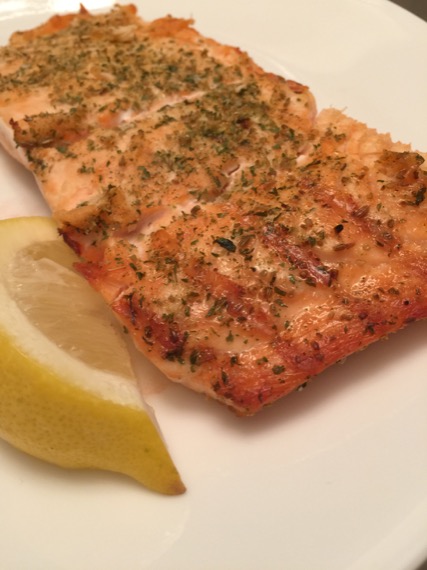
The Kamado Joe gave this salmon the perfect touch of smoke. It’s actually amazing the flavor that hard wood charcoal imparts on everything it cooks. It’s a delicate smoky background that doesn’t overwhelm the foods we’re cooking.
Since we go through all of the effort to heat up our grill (and it’s a big one… They don’t call it a Big Joe for nothing), we always grill bread to start our meal. It’s the perfect excuse to eat a buttered wedge of smoky bread. And, then, we throw a few vegetables on at the end to cook while we eat. This way we feel like all of that premium hard wood charcoal isn’t going to waste.
Next time, we’ll throw some chicken on the grill for lunches to enjoy throughout the week.
Now, granted, we’ve only used our Big Joe for quick, high heat cooking. We haven’t smoked anything, yet. So, we don’t know how that flavor translates to slow cooking. We’ll be trying that soon enough. (We’ll need a weekend day with hours to kill.)
At then end of the cooking, we close the grill. Carry over cooking cleans the grill and saves the left over charcoal for our next grilling experiment.
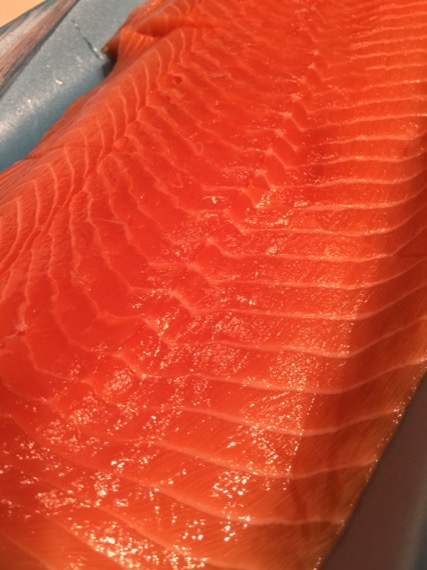
We cut one huge filleted half of salmon to cut it into serving sizes. We wanted to practice our ability to grill presentable pieces. And, surprisingly, we did quite well.
The salmon only stuck in a couple little spots.
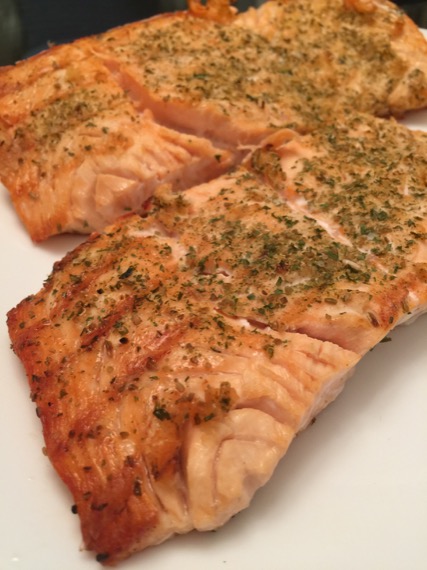
Big Joe Salmon
serves many
1 half salmon, filleted
juice of one lemon
fennel, freshly ground
black pepper, freshly ground
parsley, chopped
fine sea salt
Preheat Big Joe to 450 degrees F. Cook on first side for 4-6 minutes with the Big Joe closed. Flip each piece carefully. Then, close grill and continue cooking for another 4-5 minutes.
This was just about the perfect amount of time for fairly large pieces of salmon.
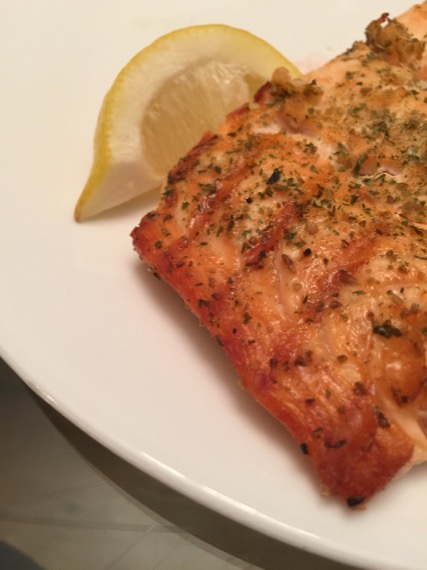
Serve with lemon wedges and grilled bread.
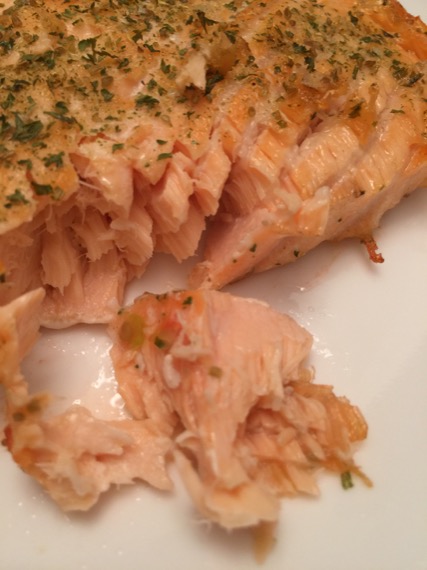
Tender, moist, and flake-y with the perfect touch of smoke.

Daydream (Darwin Hybrid)

I couldn’t resist these tulips. That gorgeous shade of orange reminds me of a beautiful, dusky summer sunset. Until cut, each flower was a tight, tiny bud. Within minutes of that first cut, each tulip literally blossomed to over triple of each flower’s original size before our eyes. Each tulip moves at its own leisurely pace. Long stems allowed for a huge centerpiece. After 30 minutes, the tulips were close to full bloom. Every morning, the stems would curl in a wild, new direction. Appearing to have a mind of their own, the flowers and stems were living art that curled into new shapes every day of the week. Their fresh, light scent was heavenly. (Changing the water daily, they were beautiful for exactly 7 days.)
In Other News:
Today, my basil seeds sprouted! About 1/3 of the basil sprouts are showing two tiny leaves.
May 18:
Miraculously, everything is sprouting (except for the tarragon). The squirrels, birds and chipmunks are trampling the beds on a daily basis in their search for water. Even with a few lost sprouts, the majority of them are still thriving. If we want a garden this year, we need to set up another source of water for the ever-annoying (and digging) squirrels and chipmunks.
May 20
All of the blueberries have been eaten.
May 25
It’s HOT! (86 degrees with 33% humidity) The chive sprouts are doing fine. But, they’re a bit wilty. All of the basil sprouts are doing very well. And, the cilantro and dill are doing quite well, too. With the daily trampling, a few sprouts go missing here and there. But, for the most part, everything is doing well. Next year, I should either add extra seeds. Or, better yet, I should cover the beds with chicken wire to keep the animals out until the sprouts get big enough to handle the trampling.

In honor of these lovely tulips:
The Tulip
makes 2
2 ounces apricot brandy
1 ounces your favorite sweet vermouth (Carpano Antica)
2 ounces Calvados
1/2 ounces lemon juice
Chill cocktail glasses in the freezer while mixing the cocktail.
Combine all ingredients with ice in a mixing glass. Stir until well-chilled. Remove cocktail glasses from the freezer. Strain and divide between two stemmed cocktail glasses. Garnish each glass with a lemon twist, if it pleases you to do so. (Slightly Adapted from the Savoy Cocktail Book)
Cheers!

Now, I remember.
It’s easy to forget over a long winter. But, it’s all coming back to me now. If there’s one headache of a garden, it’s the watering system. Something is always breaking. Either we need to buy a new timer here… or a new timer there. Or, the squirrels are chewing their way through the tubing to get at the water. (Or, even worse, the squirrels are digging up the bed as they run into the beds when the water timer kicks on. This is worse because they dig at the beds as they stand there sucking at the little nozzles. Then, when the nozzles turn off, they chew at them in an attempt to find even more water. This causes a leak in the nozzle, tubing, or both.)
It’s not the preparation of the beds, or sowing in the new soil, or planting the seeds (or seedlings). Never! That’s the fun part. It’s anything and everything related to watering the garden. So, now, we’re one week into a new gardening year. And, we have to buy more parts. We need at least two new timers, a new set of little nozzles, and a few other random parts and pieces. At least the brass pieces are holding up nicely. (So far.)

It’s a jungle out there!
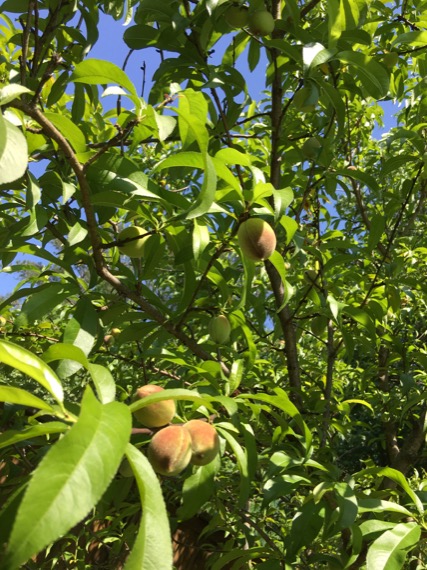
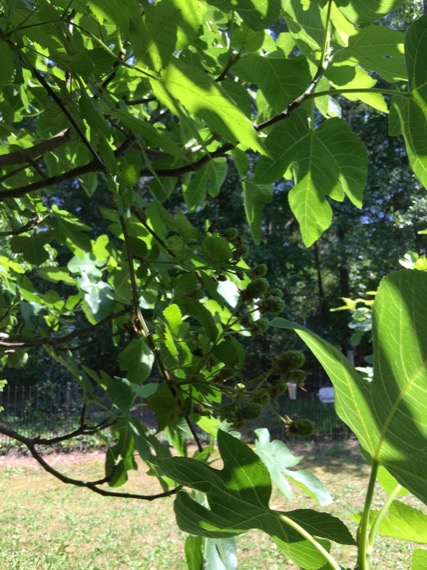
There was so much rain last year that we barely had to water a thing. Everything made it through the year nicely on almost nothing but rain water. The Dwarf Elberta peach tree is the one weak link in our garden. It’s remained almost the same size for close to two years. If anything, it’s slightly smaller this year. We had to trim off a few dead branches. But, it’s hanging in there even though it’s being crowded out by one of our fig trees.
But, it’s a beautiful jungle.
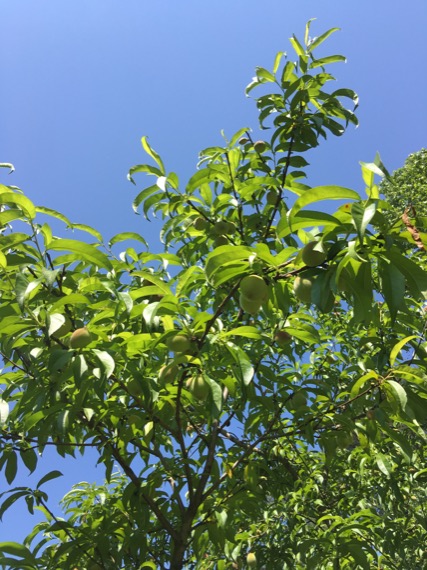
The Princess peach has grown beautifully. We take great satisfaction in that knowledge. It’s somewhere in the neighborhood of 12-14 feet tall, quite wide and shapely. There are currently quite a few peaches left after the windstorm. We’d guess that somewhere around twenty or thirty litter the ground. (at least the squirrels are eating some of the peaches those) Between the windstorms and the squirrels, we’ll be lucky to taste any this year… again. Oh well, at least we get to enjoy watching something we planted grow to such beautiful heights.
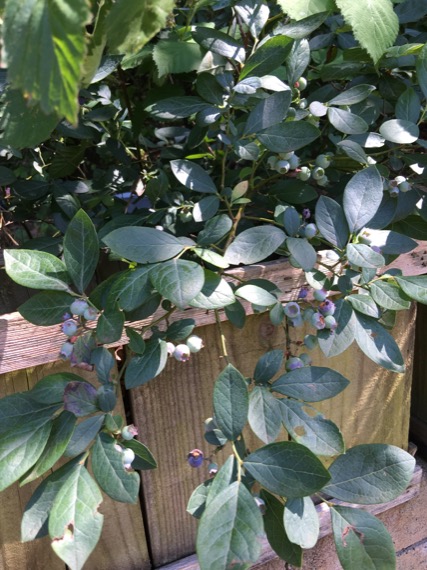
The blueberry bush has filled in quite a bit, even if it might not be the prettiest blueberry bush in the world.
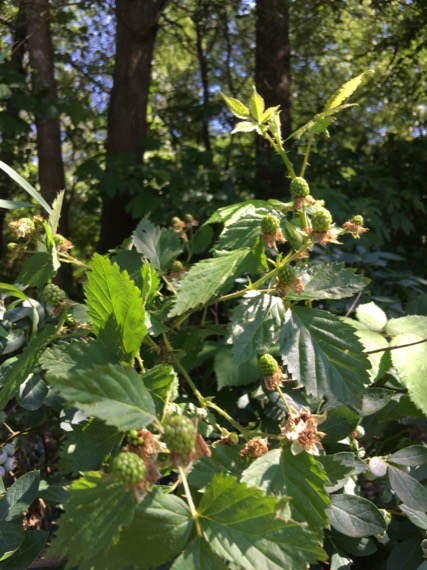
The blackberry on the hill (next to the blueberry bush is thriving. It looks like it’s trying to invade the blueberry bush’s space. So, we might have to prune it back after the berries ripen. Hopefully, this year we’ll get a taste of them. Last year, the squirrels devoured the lion’s share of berries. We were lucky to get to taste a couple of ripe berries.
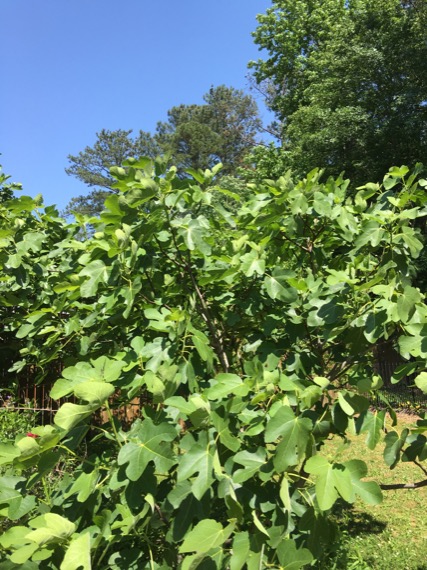
The Black Mission fig tree on the left side of the patio is thriving.
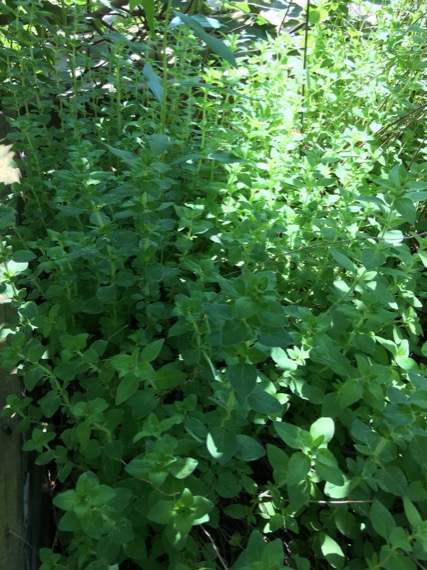
Even in the shade of one of the fig trees, the Greek oregano continues to thrive.
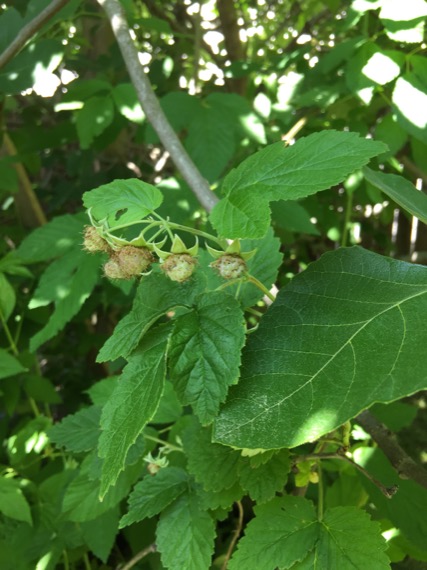
The raspberry stalks are beautiful and very healthy.

The raspberries have too many stalks to count. They’re filling up their bed, thriving and covered with green berries. Though, last year, we only managed to taste a handful of berries each. We missed picking a small patch that we didn’t see until it was too late. Birds, squirrels, and chipmunks got the rest.
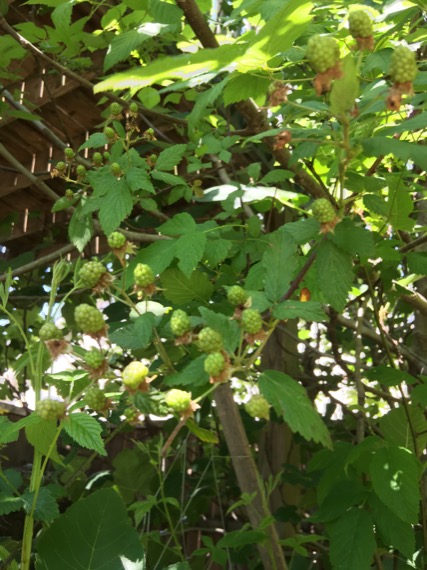
Some berry stalks are climbing the fig tree.
We’ll need to prune those branches in the fall.

Rambling Red Roses & Purple Sage Blossoms
Both fill the yard with the loveliest fragrance. My unwieldy, free-form rosemary shrub remains their only fragrant competition in the back yard.

The Black Mission fig tree on the right continues to grow much slower with two to three hours less of daylight sun. It’s less than four feet tall with just over a dozen branches. The willow tree on the far right literally planted itself about two (or three) years ago. And, it’s grown even taller since this picture was taken. We’d guess that the tiny stalk at the very top is at least 14 feet tall.

The wooden raised bed is completely rotten on the right side. We’ll need to re-do this raised bed in the fall or next spring. If we don’t plant a winter garden, we’ll wait until spring. There’s no need to leave a fresh, wooden bed to sit and rot over a long, damp winter.

By far, the raised concrete block planting bed is the endurance winner. After six years (this is the 7th spring planting season), the concrete blocks look almost brand new. If we run the pressure washer over the edges at the end of summer, they will look completely brand new.
—
Garden Additions To The Raised Beds:
Dark Opal Basil
Spicy Bush Globe Basil
Genovese Basil
Tarragon
Serrano Peppers
White Lisbon Bunching Onions
Mammoth Dill
Garlic Chives
Common Chives
Deck:
Genovese Basil
Thyme
Oregano
Chocolate Mint
Sweet Mint
Scallions
Hill Area:
Rosemary
—
It’s time for a Y Holiday!
After all of that work, I need a little weekday treat. Today, that treat will be a cocktail. Here’s a very worthy variation on the Sidecar for days that end in Y holidays. Days like.. Today! Make every day a holiday.
….if you can
Bourbon Sidecar
makes 2
3 ounces Maker’s Mark bourbon
2 ounces Grand Marnier
juice of 1/2 lemon
coarse sugar, for dusting
two orange curls, to garnish glasses
Cut a small wedge of lemon. Brush the rim of two stemmed cocktail glasses. Dip each glass in coarse (or granulated sugar) sugar. Set aside to dry.
Combine bourbon, Grand Marnier, and lemon juice in a mixing glass with ice. Stir until well-chilled. Strain and divide between your two prepared glasses. Garnish with orange curls.
Cheers!

And, while someone watched from the shade with an icy, cold beverage…

Our old fountain moved into the shade with some help.

Then, we admired our hard work.


It’s gorgeous outside.

Lets get out there and enjoy everything nature has to offer!
And, no cocktail says sunshine in a glass quite like the Sidecar. Brunch on our sunny deck begs for this simple little beauty that blends cognac, lemon and orange. It is all things fresh and light with a tart and powerful bite.
Do you want some brunch-time food with your lazy day cocktail? I’m sure you do. It would be a good idea to eat a nibble or two. You wouldn’t want your day to end prematurely, would you? How about some orange juice, a bowl of strawberries, croissants, sweet cream butter, and chunky, bitter marmalade to start off your day of leisurely garden fun? (No croissants on hand? Toast a plain, unglazed doughnut. A soft and toasty doughnut makes a very tasty marmalade vehicle, too. And, this is a great way to use doughnuts on their second day.)
Sidecar
makes 2
3 ounces cognac
2 ounces Grand Marnier (or Cointreau)
juice of 1/2 of one juicy lemon, or to taste
2 orange curls, no pith
Run a wedge of lemon around two stemmed glasses. Dip into sugar. Let dry.
In a mixing glass with ice, combine cognac, Grand Marnier, and lemon juice. Stir until nicely chilled. Strain and divide between your two prepared glasses. Garnish with orange curls.
Cheers!
(If you’re feeling particularly festive, weave a thin strip of orange zest with a strip of lemon zest for a fancier garnish. You’ll need a thin strip zester for this one.)
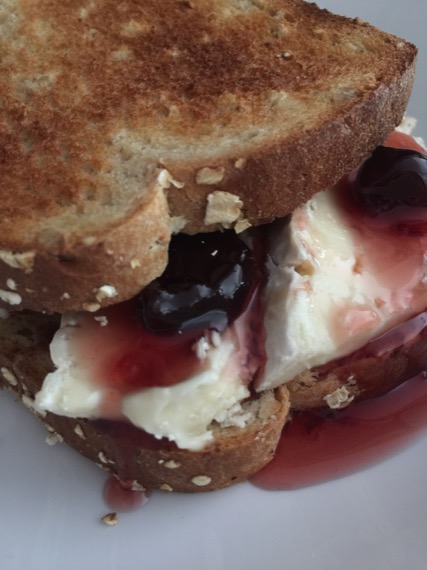
Sour Cherry & Brie On Oat Nut Bread
Not too long ago, I thought every meal had to be perfection. I’d carefully plan every ingredient to match my bakery and farmers market purchases. I’d only make this sandwich with the perfect bakery loaf of dark whole grain bread. I’d plot ways to use that beautiful bread with the best meats and cheeses filling the fridge. But, I’ve realized that’s silly. I had a perfectly beautiful hunk of brie left over and plenty of sour cherry compote. I wanted another sour cherry and brie sandwich. Guess what? It was pretty darn delicious on that ordinary bread. Never again will I wait for what I want, if i can make due. Stellar ingredients elevated those two slices of ordinary grocery store oat nut bread to make a lunch that I’ll remember.
And, I’ll be doing it again and again. Yes, I’d still rather have that perfect loaf of bakery bread. Life is too short to waste even one day. I’ll still plan. But, I’ll also work to make every one of my days special. Even if it’s just in little ways, a sandwich that might brighten my day will win every time.
Who knows what tomorrow might bring?
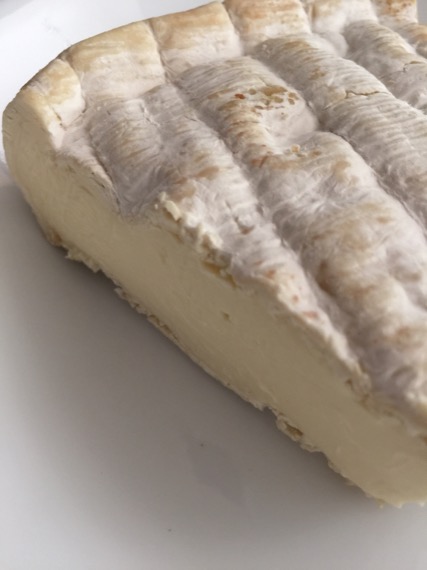
Start with your favorite wedge of brie.
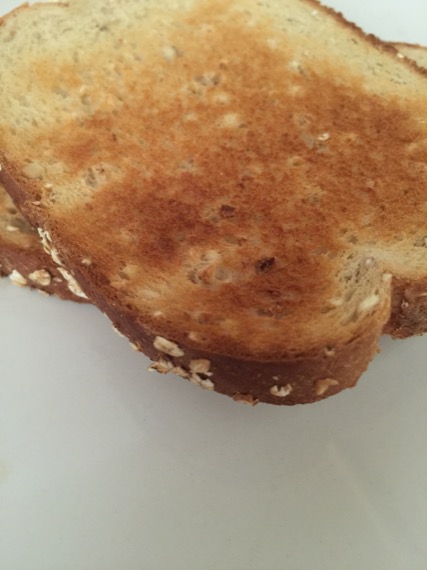
Add Oat Nut toast.
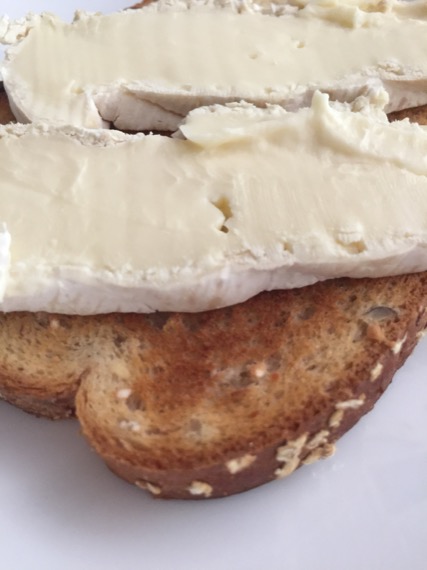
Top toast with brie.
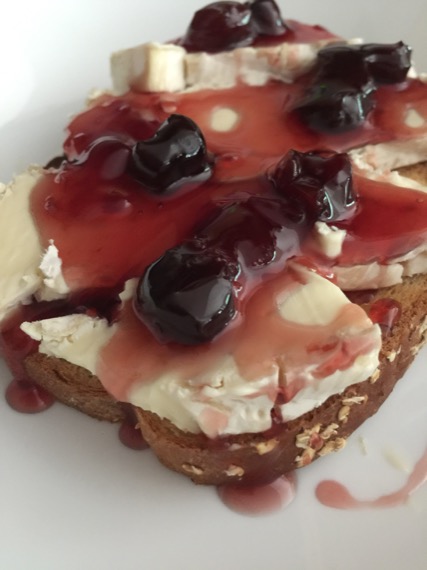
Dot with sour cherry compote. Space out the cherries evenly and add a drizzle of the syrup. Here, I’ve added a bit too much syrup. So, it spilled out over the edges. Still delicious. But, a bit sweeter than I would have preferred my sandwich to be.

Devour immediately.

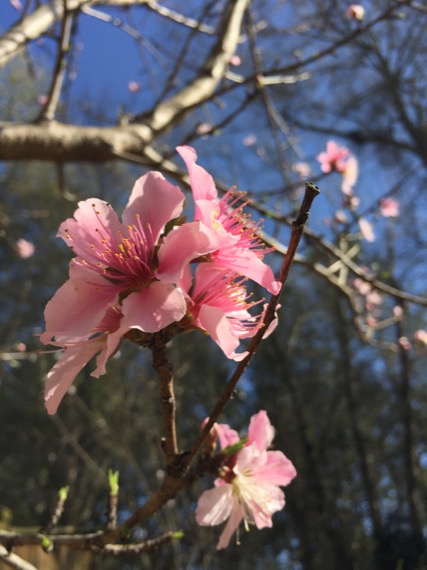
Peach Blossoms In Our Back Yard
We’ve enjoyed our house for over 12 years now.

Never Give Up!
This beautifully wild tree sure didn’t.

It’s still fighting!
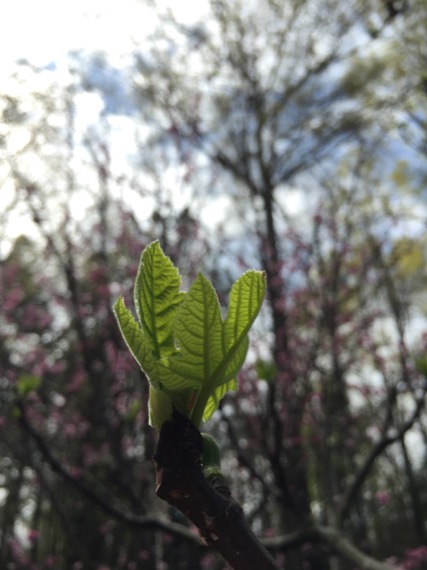
It’s amazing that this lovely fig tree came within an inch of its life one wet summer. Almost overnight, the roots had rotted. And, the tree had fallen flat. There were only two or three little roots holding the (then) thin stalk into the ground. We carefully propped up the sickly tree, watched, and waited. A few short weeks later, it was going strong again. By the next year, it nearly tripled in size. And, every year thereafter, it would easily double in size.
…for many years.
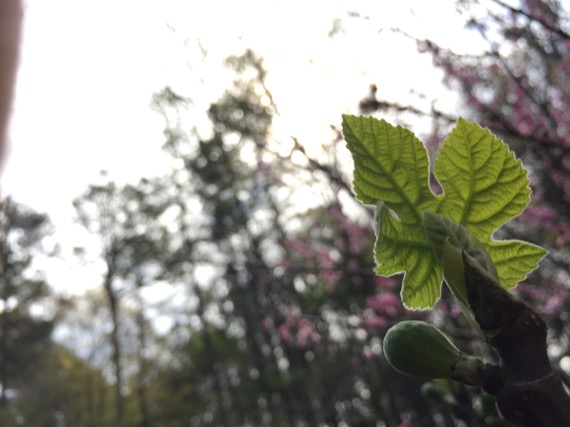
Now, it’s close to full size. But, it still grows a little bit every year. Though, now over 12 years old, we believe it’s entering the end of its life span (or at least, it’s fig producing life span). This year our old beauty is getting off to a slow start. So,we did a little research. And, it appears that fig trees remain active fig producers for 12-15 years. The tree can live for many more years. Though, the figs might be done for… That explains why our figs have been small, less sweet and less flavorful for the last couple years.
Given this poor old tree’s rough start in life, it’s probably close to a miracle that it’s still as beautiful as it is.

Sandwich of The Week
Brie & Sour Cherry On Whole Grain
makes 1
2 slices dark 9 grain bread (or Oat Nut whole grain)
French brie (soft, ripe)
sour cherry compote
Toast bread to a dark golden brown. (If desired, butter bread. This sandwich is rich enough without the butter. But, the butter makes it seriously rich.) Schmear with brie. Drizzle very lightly with sour cherry compote. Evenly space cherries on top of brie. Press remaining slice of toast down on top. Slice in half.
Devour immediately.
—
Here’s another favorite quick and easy meal that came about one day when I was too lazy to make a grilled cheese. Yes, that’s pretty lazy. But, I’m so glad. This was so much better.
Brie Toast
makes 1
1 slice cinnamon bread with raisins
French brie
Toast cinnamon bread lightly. Schmear generously with soft brie. Drizzle with honey, if desired. Serve with Brandy Oolong tea and fresh strawberries.

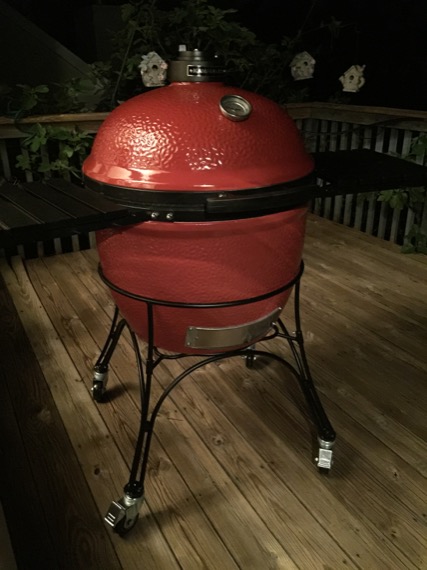
The Kamado Joe
Big Joe

The Big Joe
It doesn’t really take up the whole deck.
…it just looks that way
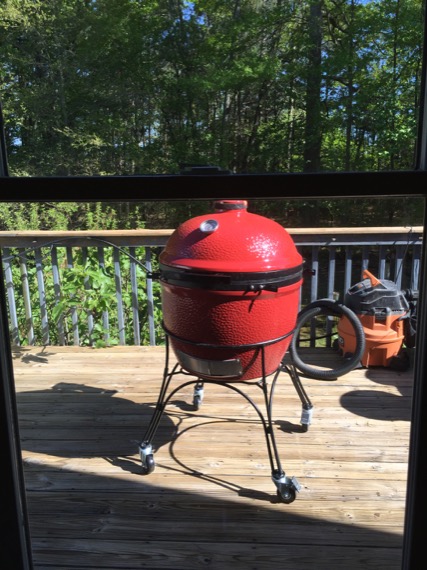
(We tidied up our deck for its new occupant.)
It will never look this clean again.
It took almost 3 people to haul this big boy up to its elevated location. (The third person had to remove the deck door. This fatty can’t make it through a standard door frame.)

Heavy Duty Cast Iron Top Vent
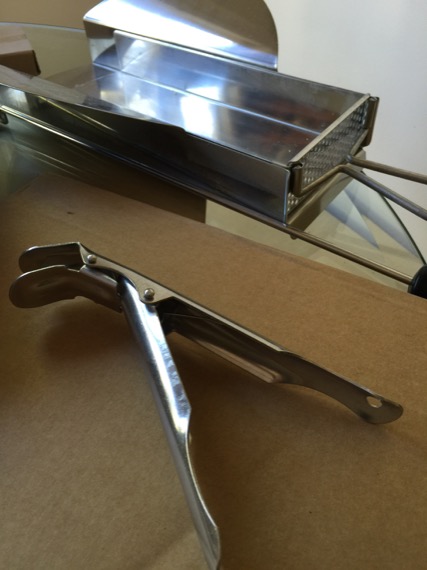
All of the pieces are made of high quality stainless steel…
…and they feel (extremely) heavy duty

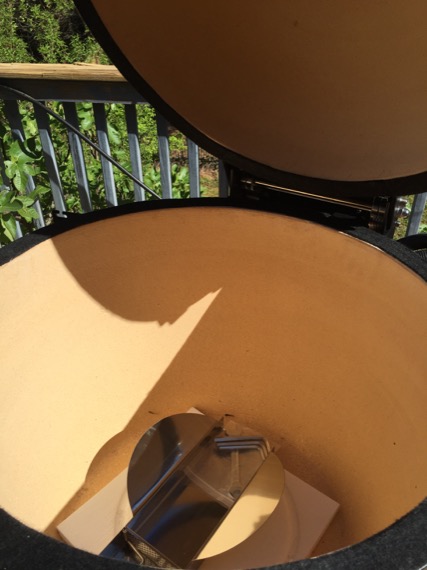
We lucked into a great deal at Costco. It came with all of the divide and conquer flexible cooking system pieces(which includes a fire box divider), heavy duty cast iron cart with locking wheels, heavy duty stainless steel ash drawer with tight sealing vent, grill griper, ash tool, fire starters, starter kit, video, AND a Big Joe Grill Cover.

The two side shelves have plenty of room for a couple plates or one giant platter.
Assembly is really a piece of cake. But, if you’re perfectionists like we are, you’ll waste about an hour watching and rewatching the video and a few YouTube videos for good measure before you decide to go shopping for a couple steaks, fresh corn, and marshmallows (Yes, we’re children at heart). Then, you’ll end up starting your fire at almost 9pm (for the first time).
We really love it!

The big lump charcoal makes such a big difference in the final flavor.

And, here’s another last look at our pretty (clean) grill interior.
—
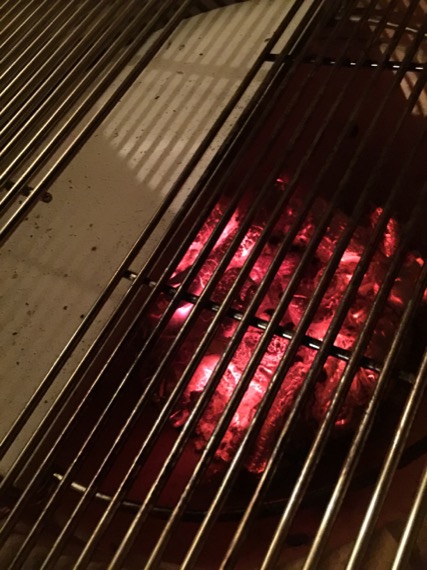
Let’s start off with the facts: There is a definitely a learning curve. That learning curve might be a bit harder to overcome when we’re out in the pitch black at 10pm trying to cook our first steaks. The temperature was dropping by the second. And, we believe that we didn’t put enough hardwood charcoal in the grill. So, we’re already starting off on the wrong foot.
Guess what?
That’s ok. It all worked out in the end. We don’t really know how. Stupid luck? Probably. But, we ended up with some seriously delicious and tender medium rare ribeye steaks.
We were told that it should take about 20 minutes to heat up our Big Joe. It took us at least an hour after getting off to a bad start. We initially closed the grill too soon on the first try and accidentally put out the fire.
—
Fast forward about an hour…. and we’re starving! So, we decided to grill some bread. After two minutes over premium hardwood charcoal, a slice of Kroger’s most basic (and uninteresting) bread was delicious. Yes, we were starving. But, still…
We have some guesses about this. Grocery store bread tends to taste a bit on the raw side. A few minutes over high, smoky heat does this mediocre bread a bit of good. The crust crisped up nicely. The outside had a nice gentle smoky flavor. And, the interior was hot with a nice chewy bite.
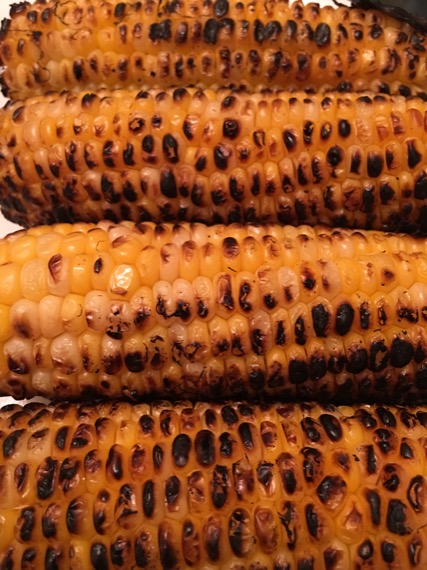
We brushed the corn with soft butter and a light sprinkling of parmesan. It was simple and quite good. But, we’ll be working to improve this one. We both love grilled corn on the cob. So, this won’t be a hardship.
In a miraculous feat of dumb luck, the steaks were tender and delicious. Again, it’s not just the grill that makes this magic. It’s the high heat, quick cooking combined with a well-insulated grill and premium charcoal.
We can’t emphasis enough the beauty of premium hardwood charcoal in big chunks. It’s the flavor of steak house steaks that we’ve always been missing in our home cooking lives.
(Below, these times were on a late, cold (50 degree COLD and breezy spring) night. We’ll be experimenting with times as the temperatures rise this spring and summer.)
—
Day One
Grilled Bread
1 inch thick slices Kroger’s $1.50 fat loaf
400 degrees F — grill 1 minute per side over direct heat with the grill closed
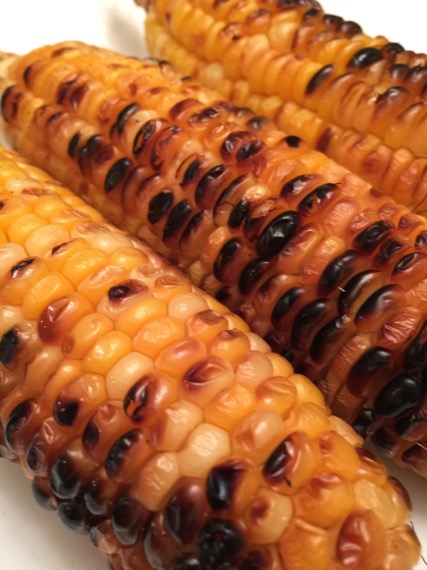
Corn On The Cob
corn on the cob, freshly washed
400 degrees F — 3-4 minutes per side over direct heat with the grill closed, or until roasted to your liking
— Then, move to indirect heat side of the grill for at least 15 minutes with the grill closed
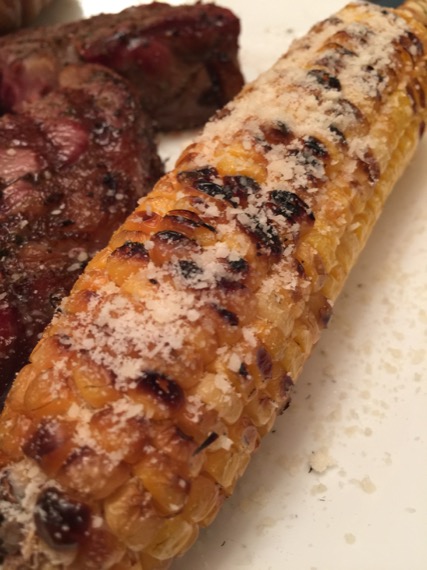
The corn was lightly brushed with butter and a light sprinkling of parmesan topped it.
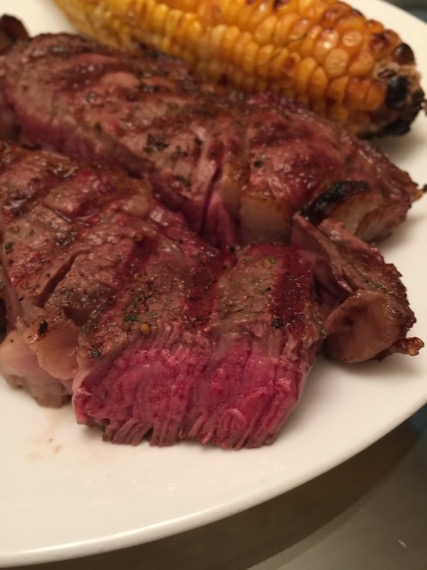
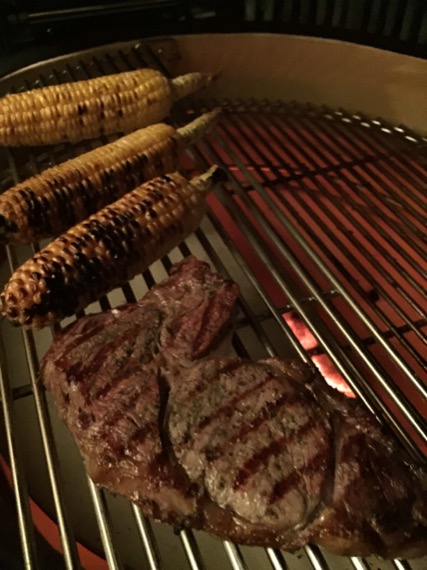
So incredibly tender…
and the flavor…
We can’t believe these were our first two steaks on the Kamado grill. The end result was significantly better than we expected for our first try. After resting, we sliced them right down the middle. And, the cooking was even from one end to the other.
Ribeye Steak
Steak Rub
sprinkle of freshly ground fennel
sprinkle of freshly ground black pepper
sprinkle of Italian flat leaf parsley
light sprinkle of fine sea salt
(Due to our first time efforts to start the fire, our steaks sprinkled with steak rub rested about 72 degrees F for about 1 hour. We don’t know if this contributed to the tenderness of our steaks. But, we will say, these steaks were incredibly (surprisingly) tender.)
425 degrees F — 3 1/2 minutes per side for 3/4 inch thick ribeye steaks over direct heat with the grill closed
Let rest for 4-5 minutes before serving.
(The directions for this stated to preheat to 500 degrees F. Then, cook for 3-4 minutes per side over direct heat with the lid closed. Then, place over indirect heat for one minute with the lid closed. But, we were afraid that we hadn’t used enough hardwood charcoal. And, we were afraid that our fire was going out after getting off to such a slow start. We’re lucky this worked out since we didn’t follow the directions.)
—
The Second Day
We used a more generous amount of hardwood lump charcoal.
Fire Starting:
It took 10 minutes with the grill open. Then, we closed the lid and partially closed all of the vents for 10 minutes. (In total honesty, we probably should have started grilling at 8 minutes. By the time the full 10 minutes were up, the grill had reached 550 degrees F. So, everything cooked up a bit faster than we had intended.)
Corn:
It charred nicely with about 3 minutes per side over direct heat. Then, about 15 minutes over indirect heat. The end result had a nice char with tender corn on the inside. (But, ideally, we think it charred up a bit nicer at about 450 degrees. Then, we’ll move it to the indirect heat side for a bit longer than 15 minutes.)

Sausages:
Different types of sausages grilled up nicely in a range of 10-15+ minutes. (Next time, we’ll cook sausages over a slightly lower heat for a longer time frame.)
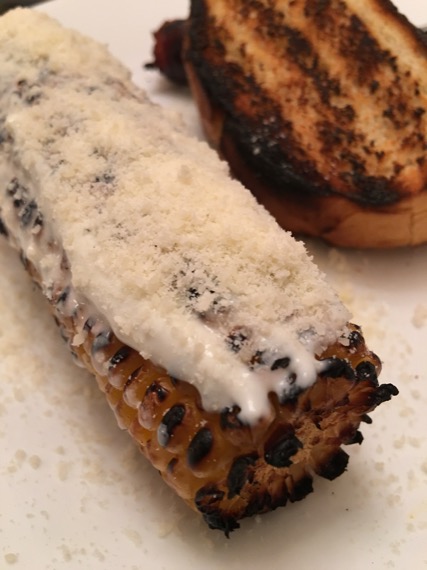
Char Grilled Corn With Sour cream & Parmesan
(Or, home-made bleu cheese dressing & parmesan)
Both versions were very tasty.
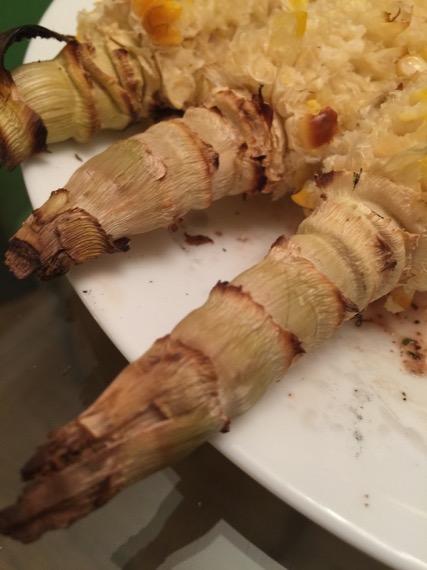
Who needs corn holders? The stalk makes a lovely built in holder.
|
|


